Sometimes the one move that would benefit you most is the one you'd most prefer to skip. In the case of the lower body, you'd be hard pressed to find a move as loved by coaches, and hated by lifters, as the Bulgarian split squat, aka the rear-foot-elevated split squat (RFESS).
What's to hate about this move? Where to start? It can be a crazy balance challenge, it often makes you sore as hell in both the glutes and quads for days afterward, and plenty of people aren't nearly as strong at it as they feel like they should be, given how much they can bilaterally squat.
So…what's to love? The RFESS has been shown by peer-reviewed studies to be just as effective as the back squat at building lower-body strength, and superior to the back squat for improving acceleration, agility, and change of direction speed.[1-3] This has obvious implications for those training for sports such as football and soccer, but also just for people who want strong (and strong-looking) legs without the wear and tear that comes from heavy squats.
Famous strength and conditioning coach Michael Boyle has even argued this exercise is superior to the bilateral squat for improving lower-body strength and athleticism, and he's not alone. At our facility, JKConditioning, we've noticed that this exercise is excellent for both quadriceps and gluteal hypertrophy and for creating that nice-looking teardrop of the vastus medialis muscle. It's definitely a go-to lower-body exercise for our clients.
In short, this is one side dish that deserves consideration as the main course. But, if you're going to make it that, you'll need more than one variation in your arsenal.
First, the basics
Like any multijoint exercise, the setup for the RFESS is crucial if you want to reap the rewards it offers.
Here's your step-by-step guide, which applies to all of the variations we'll cover:
1. Start by standing roughly a lunge-length in front of the RFESS bench.
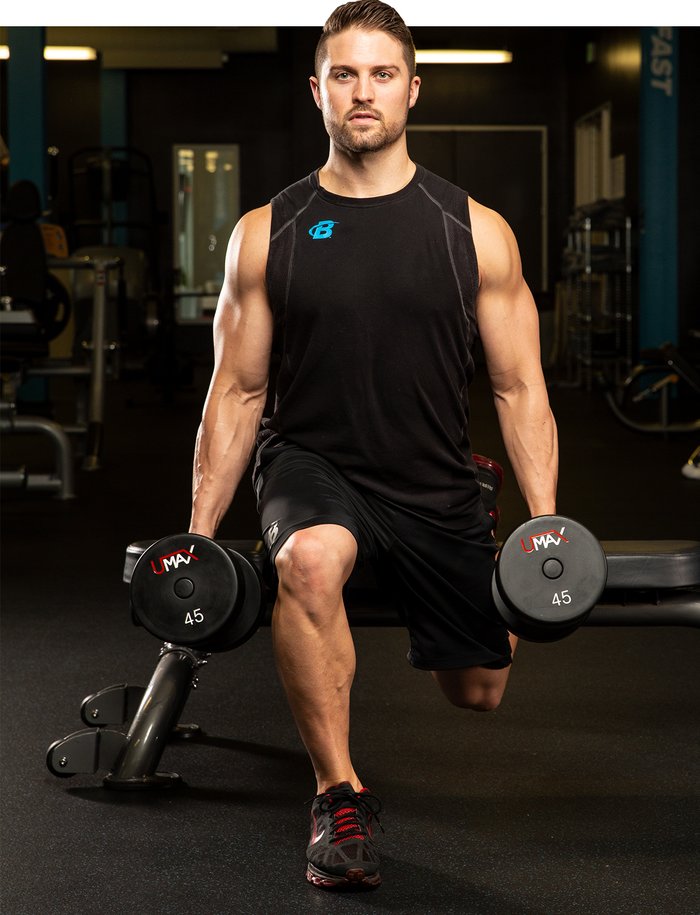
Reach back with your right leg and place the shoelaces of this foot on the round part of the bench. If you're lucky, your gym has already invested in one of the new rounded benches made specifically for the RFESS. If not, you can improvise your own by putting a barbell in the rack or Smith machine at about 12 inches from the ground, with a pad on the bar to protect your foot.
2. With control, squat down until your right knee lightly contacts the floor.
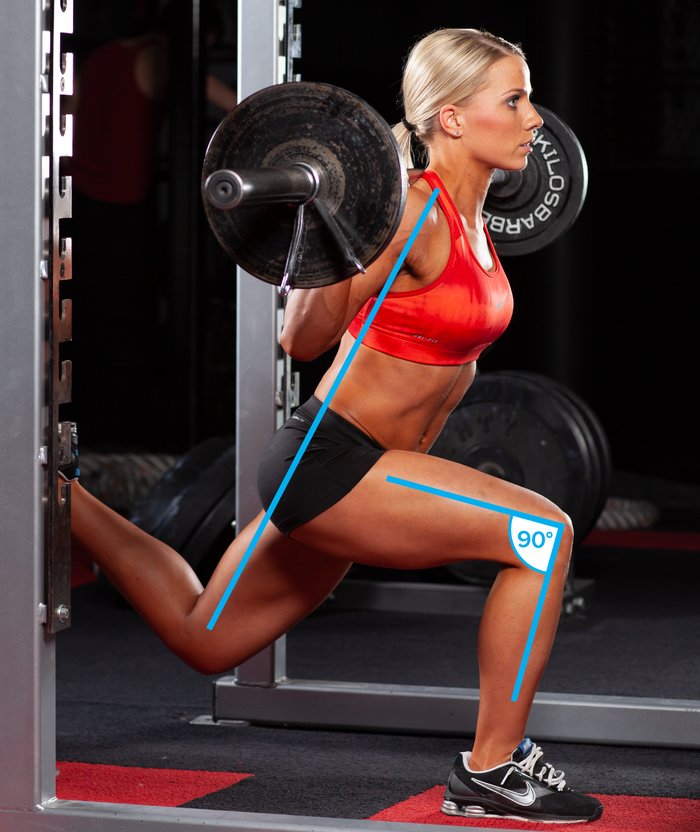
Your front knee should be roughly at a 90-degree angle, your chest should be up and out, and your lower back should be neutral. We recommend maintaining a straight line from your shoulder to your hip to your rear knee. A slightly more hinged hip can work as well, but this variation will entice more of a deadlift-type action on the way up.

3. Push your front foot into the floor, driving through your heel and not your toes.
If you find that you are pushing through your toes, move your front foot farther forward. Finish the movement by squeezing your glutes in your left hip.
4. It's OK to take a short break between sets of legs to maintain the quality of your reps.
The RFESS will often leave you gasping for breath to a surprising degree!
A final note: Some trainees will feel a painful stretch in the quadriceps muscles of the trailing leg if the squat is too deep. In this case, you might benefit from placing a cushion on the ground to aim for. An Airex pad usually does the trick.
Typically, the RFESS is performed with dumbbells held at the sides like suitcases. This works well and is very challenging, especially once you get near carrying your body weight or more between your hands. But if you want to spice up the RFESS, give these three tips a try.
Variation 1: Climb the ladder
Unilateral exercises present some great options for challenging protocols, such as the ladder rep scheme. This approach takes advantage of the fact that the trailing leg is essentially resting during a RFESS.
To execute a split squat ladder, start by standing in front of the RFESS bench. Reach back and perform one rep, then switch legs and perform one rep on the other leg. Switch legs again and perform two reps, and so on.

Seems simple enough, right? Now go all the way to 10 reps per leg and see how not simple it really is. This rep scheme is great for those with muscle-building goals as it results in a ton of volume—55 reps per leg!
When doing the 1-10 ladder, you will need to seriously reduce the weight or even just use body weight to start. If you are looking for a more strength-focused ladder, try doing 40-60 percent of your RFESS 1RM for a 1-5 ladder.
Variation 2: Move the load around
Back-loaded: There's nothing wrong with the classic suitcase dumbbell hold, but it's just one of many great options. To really add some weight to the RFESS, try it with a barbell on your back. This variation will really fire up the glutes and hamstrings. Plus, you'll be unlimited (theoretically, at least) in how much weight you can carry.
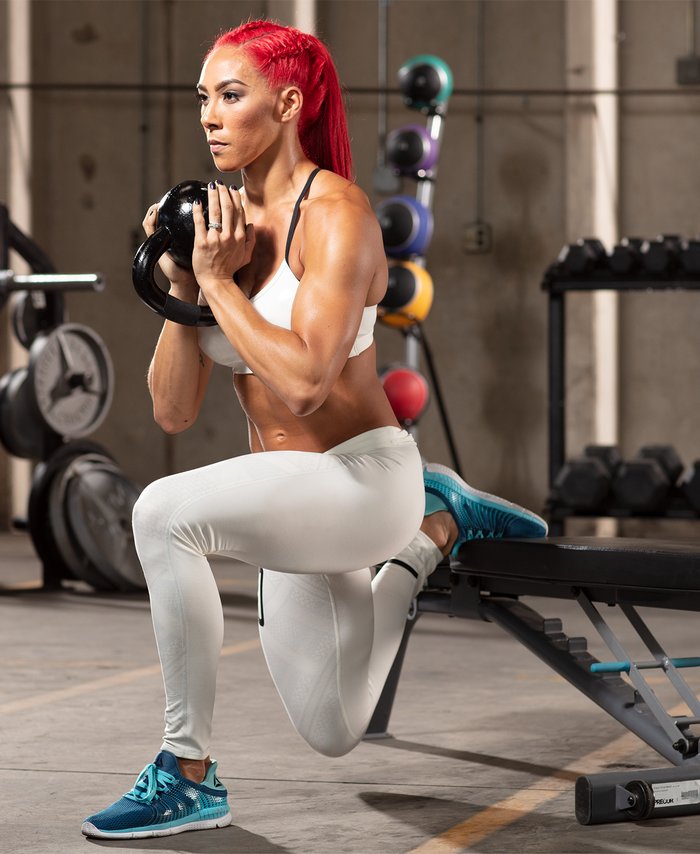
Front-loaded: Looking for a more quad-dominant version? Try one of several front-loaded options with a slightly closer stance to the RFESS bench. These include a single dumbbell held in the goblet position or two kettlebells held in the front-racked position. If you are really adventurous and you have the necessary mobility, try the RFESS with a barbell racked in the front-loaded position.
With an offset load: Finally, if more stability and balance is your goal, try an offset loaded RFESS. To do these, hold a single dumbbell in the suitcase position in the hand opposite to the front leg. This will challenge your front leg to keep balance from side to side, or what we trainers call the frontal plane.
RFESSs can also be done with two different weights. For example, hold a heavier dumbbell in the hand opposite to the front leg and a lighter dumbbell in your other hand. This will have a similar effect to only holding one dumbbell, but allow you to load more heavily.

To really ramp up the core challenge, try holding a dumbbell or kettlebell in the front-loaded position in the opposite hand to the front leg, while holding a dumbbell in the suitcase position in your other hand.
When performing reps with any of these offset loads, really try to minimize any side-to-side movement. It won't be easy.
Variation 3: Elevate the front foot
Sometimes, the best way to progress an exercise is to add just a little more range of motion. Think deficit deadlifts versus regular deadlifts, for example. For the RFESS, this means elevating the front foot. Elevating the front foot can add several inches to the range of motion of the RFESS, making it even more challenging to your leg muscles, and adding some serious stretch to the glute of that front leg.
The height that the front foot is elevated will depend on the height and mobility of the lifter. Start with a modest elevation of one inch, and if that's no challenge, work up from there. In our gym, we've found between 3 and 6 inches works best.
Not your average lower-body exercise
If you're too gassed after doing bilateral squats to give serious energy to these unilateral variations, consider doing a phase where you switch the two. Get seriously strong in the RFESS as a primary goal, and treat bilateral variations as a higher-rep assistance movement.
There's no downside! We've noticed that when RFESS strength goes up, so does your bilateral squat, so it's a win-win. Or even if you keep the RFESS as an assistance move, slot one or two of these variations into your weekly workouts to reap serious benefits.
References
- Speirs, D.E., Bennett, M., Finn. C.V., Turner, A.P. (2016). Unilateral vs. bilateral squat training for strength, sprints, and agility in academy rugby players. Journal of Strength and Conditioning Research, 30(2), 386-392.
- Brorsson, S., Olsson, M. C., Bengtsson, O., & Petersson, J. (2010). Maximal strength in one leg squat correlates with acceleration capacity and agility.
- Fisher, J., & Wallin, M. (2014). Unilateral versus bilateral lower-body resistance and plyometric training change of direction speed. Journal of Athletic Enhancement, 3(6).


